QUESTION IMAGE
Question
128 review sheet 11
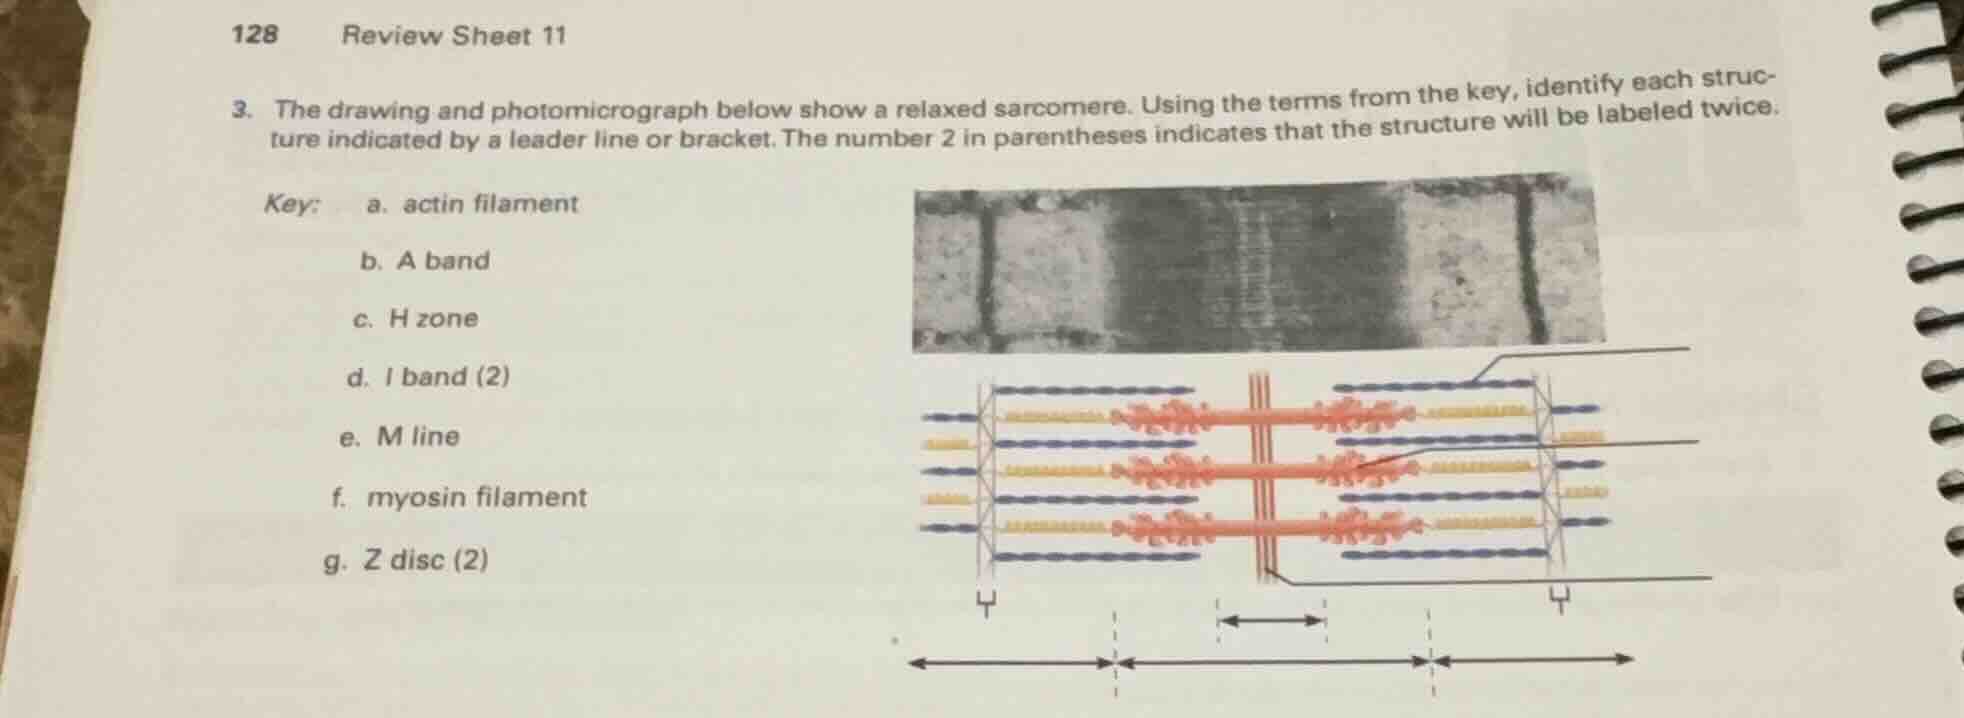
- the drawing and photomicrograph below show a relaxed sarcomere. using the terms from the key, identify each structure indicated by a leader line or bracket. the number 2 in parentheses indicates that the structure will be labeled twice.
key:
a. actin filament
b. a band
c. h zone
d. i band (2)
e. m line
f. myosin filament
g. z disc (2)
Identify the structural components of a sarcomere
We analyze the diagram of a relaxed sarcomere to identify the structures pointed to by the leader lines and brackets. We will use the Skeletal Muscle Structure concept to map each label to its corresponding key term:
- Z disc: The boundary lines at each end of the sarcomere. The brackets at the bottom left and bottom right point directly to these boundaries.
- I band: The light band containing only thin filaments, spanning across the Z disc.
- A band: The dark band containing the entire length of the thick filaments.
- H zone: The lighter region in the middle of the A band containing only thick filaments.
- M line: The dark line running down the center of the H zone.
- actin filament: The thin filament (represented in blue).
- myosin filament: The thick filament (represented in red/orange with heads).
Trace the leader lines on the right side
Let's trace each of the five leader lines pointing to the right side of the diagram from top to bottom:
- First line (top right): Points to the thin blue filament, which is the actin filament (a).
- Second line: Points to the thick red filament, which is the myosin filament (f).
- Third line: Points to the vertical line in the center of the sarcomere, which is the M line (e).
- Fourth line: Points to the Z disc on the right, which is the Z disc (g).
- Fifth line (bottom right): Points to the Z disc on the left, which is the Z disc (g).
Trace the brackets at the bottom
Let's trace the brackets and double-headed arrows at the bottom of the diagram from left to right:
- First bracket (far left): Spans the region containing only thin filaments around the left Z disc, which is the I band (d).
- Second bracket (middle): Spans the entire length of the thick filaments, which is the A band (b).
- Third bracket (center double-headed arrow): Spans the central region of the A band where there is no overlap with thin filaments, which is the H zone (c).
- Fourth bracket (far right): Spans the region containing only thin filaments around the right Z disc, which is the I band (d).

Snap & solve any problem in the app
Get step-by-step solutions on Sovi AI
Photo-based solutions with guided steps
Explore more problems and detailed explanations
Based on the anatomical structures of a relaxed sarcomere, the labels correspond to the following terms from the key:
- Top right leader line (pointing to thin filament): a. actin filament
- Second leader line (pointing to thick filament): f. myosin filament
- Third leader line (pointing to central vertical line): e. M line
- Fourth leader line (pointing to right boundary line): g. Z disc
- Fifth leader line (pointing to left boundary line): g. Z disc
- Bottom left bracket: d. I band
- Bottom middle bracket: b. A band
- Bottom center double-headed arrow: c. H zone
- Bottom right bracket: d. I band